
How to make Minecraft windows for a themed bedroom with curtains and window decals designed with the Cricut Air 2.
So. I’ve been chugging away at my older sons’ Minecraft room, despite being due with Baby #3 in August and feeling quite sluggish. I’d really rather be napping. I really need to be making cute things for the baby. But I’m making a Minecraft room because I’m a blogger and the show must go on.
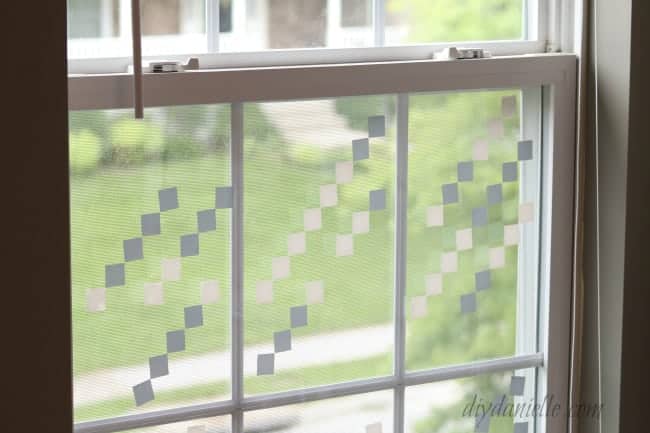
Today’s project for the Minecraft themed bedroom was to create Minecraft looking windows. They’re blocky… naturally… which works well with the shape of most standard windows. This is mostly just printing squares and placing them, woot!
This post may contain affiliate links which may earn me commissions should you click through them and take certain actions. As an affiliate for Amazon, Cricut, xTool, Home Depot, and other sites, I earn from qualifying purchases. Please DIY carefully. View my full legal disclosures here.
Please read the whole post so you don’t miss any important information!
This post was sponsored by Cricut. This blog is not associated with Minecraft or any of its affiliates. This post is intended for personal use only. Thank you!
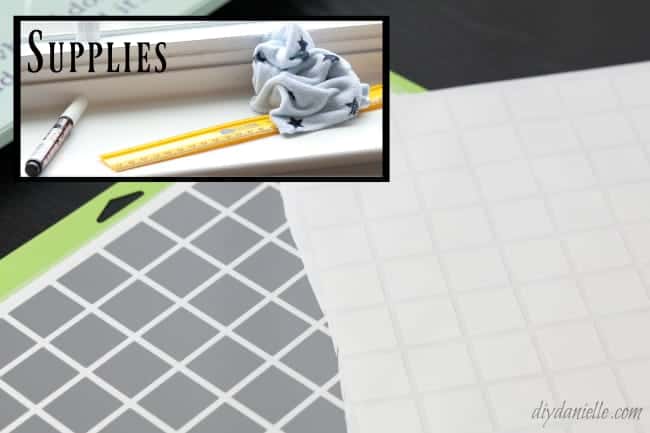
Supplies
- Cricut Air 2 and associated supplies
- Cricut Window Cling: White and Silver
- Ruler
- White Chalkboard Marker or a Dry Erase Marker
- Something to erase with
Use the Discount Code DIYDANIELLE on cricut.com for 10% off any cutting machine or heatpress (no minimum). Excludes: materials/accessories/mystery boxes/etc. Applies to US/CA only, code expires 12/31/23.
Tutorial
This particular part of the project seemed fairly simple… and it is, in terms of making these with my Cricut Air 2. The part of the project that really stumped me was deciding on what type of product to use.There were a few choices.
1. Outdoor Vinyl: This will stick and stick hard. It also comes in many colors which is nice. The problem with outdoor vinyl is that it’s really made to stay on there forever. I’ve heard people use it for car decals and such though and that it is possible to remove (assuming a bit of heat helps). Also, once you get this on, it’s on. There’s no fixing the position. That left a lot of room for me to mess up with so many blocks to add.
2. Indoor Vinyl: This will stick fairly well, but still be removable. While easily removable, I wouldn’t bank on being able to move the pieces to a better spot… I think the vinyl could get destroyed while moving it. It also comes in a lot of colors. But when it boiled down to it, I was concerned that it would have all of the downfalls of the window cling without as many benefits. I was predominantly concerned that the amount of sunlight the window gets will cause the vinyl to peel off on its own… I’m anticipating that the window cling will be less prone to peeling with heat. I hope.
3. Window Cling: Very easy to remove and move around. Minimal color options. This has its good points and its bad points because you can rearrange it if you mess up, but your kids can also destroy all of your hard work.
I ended up choosing window cling and I hope I will not regret it.
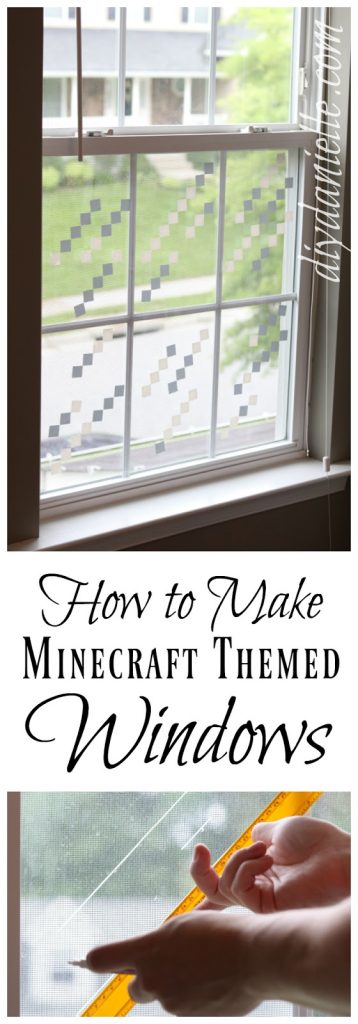
The second tough decision was deciding what size to make the blocks. Bigger blocks means fewer blocks to place. But the windows in the game have many, many of those small blocks. So it’s not as authentic to just slap a few on there and call it a day. I haven’t been sticking to 100% authenticity, but I have been trying to find a balance between authenticity and maintaining my sanity. I started with 1.5″ blocks, but decided to decrease the size to 1″ after measuring each window pane on our windows. I’m giving you the design for the 1″ version, adjust as needed if you desire.
Once you open the design, you can print it twice- once on white cling and once on gray cling. I did one sheet of 12×12 for each color.
Weed away the extra vinyl (the stuff that isn’t the blocks).
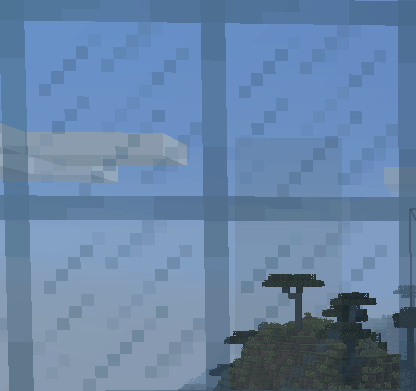
Now this is the part where I didn’t check my memory (and photo), then sat staring at my window like “Why does this look all wrong?!” I forgot to turn my squares. I was glad I hadn’t used 651. So just for clarification, this is what the Minecraft windows look like in the game.
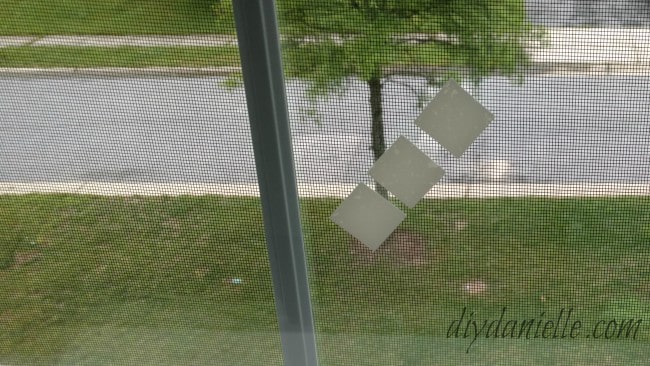
This is what I started out trying to do:
Hahaha. I was so discouraged too! Like, “MY WINDOWS LOOK AWFUL! I GIVE UP!” I’m glad I checked the screenshot. Friends, mom/pregnancy brain is real. I’m pretty sure the blood in my body is all in my extremities, ready to super power my protective mama bear instincts. And grow a baby. All those things.
Needless to say, I got my brain together and got to work. These took quite some time to put on- probably a few hours. I decided to just do the bottom windows to save myself time and supplies. I definitely didn’t not have the patience to do twice the work!
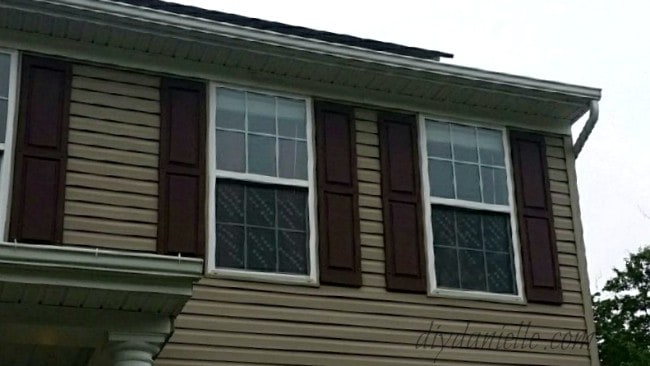
I also didn’t want it to look too busy from the outside… this is an in progress photo from the outside….
First you’ll need to print out your squares on the Cricut Air 2 and some silver and white decal vinyl. Weed away the excess vinyl… due to the size and material, it comes off really easy.
If you’re good at eyeballing things, you might be able to line everything up by eye, but I needed to draw out lines for spacing. I used a ruler and a white chalkboard marker (super easy to erase) to draw my lines, making sure that each line was at approximately the same angle. I gave two ruler widths between each line I used.
Once you have your lines drawn out, you can line up your decals on them, just like in the picture (and the video below). I looked at the sample picture from the game to get an idea on the color changes. It seemed like it was mostly one color then one or two squares of the other so that’s what I went with. I erased the lines as I went, but used them to line up the corners of the squares so they’d all be even. It worked great.
I kept my cloth handy for erasing all of the white marker as I went.
Once you do every pane (that you desire to do), you’re finished! Not so hard, just time consuming.
My kids love it. I’ve been promised they won’t take the decals off, at least not until I get pictures of the finished room (which is still a work in progress). We’ll see. I told them there’s no way I’d put them back on after all that time it took! But I LOVE how easy the decals were to move around. They really were perfect.
Next week I’m going to post about my Minecraft curtains and tie backs so keep an eye out for that post or subscribe so you won’t miss out!
Video of the Process
Love it? Share it!
Please share and pin this post! If you make this project, share it in our Stuff Mama Makes Facebook Group. We have regular giveaways for gift cards to craft stores. You can also tag me on Instagram @doityourselfdanielle; I love seeing everything you make!
Google Web Story: Minecraft Windows with Cricut Window Cling