
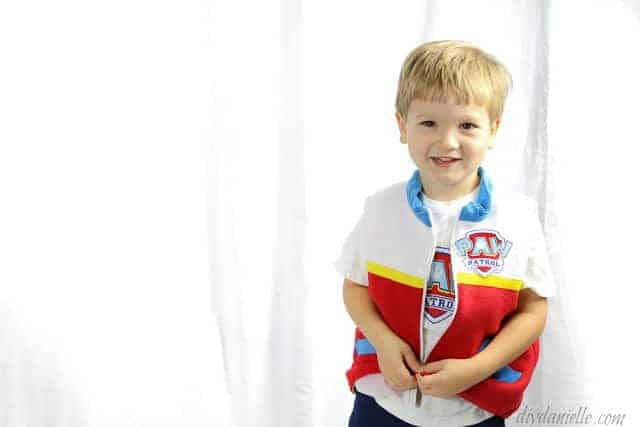
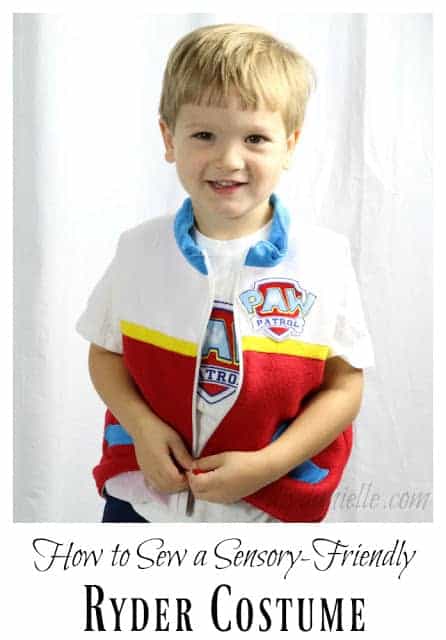
This Paw Patrol Ryder costume is a huge hit and sensory friendly for children who don’t love the bulk or feeling of the traditional store bought costume.
This post may contain affiliate links which may earn me commissions should you click through them and take certain actions. As an affiliate for Amazon, Cricut, xTool, Home Depot, and other sites, I earn from qualifying purchases. Please DIY carefully. View my full legal disclosures here.
The majority of my content is generated by me, as are 99% of the photos and videos, but I utilize technology for titles, descriptions, video editing out all of my ums, and occasionally for text overlay on images.
Please read the whole post so you don’t miss any important information!
This blog is in no way affiliated or sponsored by Nick Jr., their subsidiaries, or affiliates. This tutorial is intended for personal use only.
This year I decided to get my 3 year old a less intense costume as he doesn’t seem to do well with dress up. His favorite show is Paw Patrol so I decided to make him a Ryder (the human) costume… Paw Patrol vest, jeans, spiked hair. I made this in the 5T size.
I’d like to pause and mention something here… If you want to dress up in a store bought costume for Paw Patrol, they have costumes to dress up like the dogs from the show. But not Ryder.
And I couldn’t find a dog costume for my dog either (G says Tyson can be Zuma). So of course this means I’m making two costumes. And nobody has done a tutorial that I could find so I mostly winged it.If you’re in a cooler climate or want to use this during the winter, add sleeves. It doesn’t need to just be a costume.
No time now? Pin it for later: https://www.pinterest.com/pin/48554502216805368/
This costume is not for sale. If you’re interested in buying a premade Ryder vest, click this link: Buy A Handmade RYDER VEST
Supplies
Double check what you order. I am trying to link to similar products to what I used, but I often work from my fabric stash or buy from the store.
- Yellow fleece
- White fleece
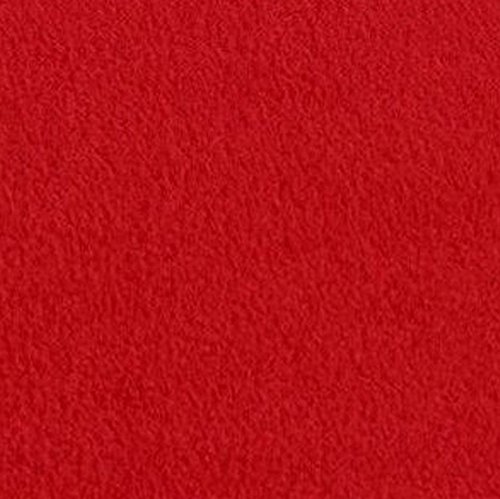
- Red fleece
- Blue ribbing
- White lining fabric (something light if you think it might be a warm Halloween where you are, or you could use a thicker lining if you’re in a cold area)
- Paw Patrol Patch
I used The Simple Vest pattern from LilyBirdStudio .
I had to tweak it some so it would work for a Ryder vest. I thought the pattern had excellent instructions with photos which is why I love buying patterns online so much. I cell phone photographed the PDF instructions and then was able to look at my phone to see each step.
It was a slow process because it was my first time doing pockets, a vest, and also I’m just not great with zippers. It also needed quite a bit of tweaking to make it a replica Ryder vest so I was trying to carefully think things through.
A Note on the Paw Patrol Patch
I used this embroidery design because even though it’s not exactly like the one on Ryder’s vest in the TV show, it makes it more obvious what the costume is. Plus I was having trouble finding something I preferred more. I also used this design to make my son a shirt. I embroidered the design in smallest size onto a piece of white fleece, cut around it, then applied wonder under (double sided) and ironed it on the design, then ironed design on the vest. This worked pretty well.
Embroidering was a lot of work though so unless you have a machine and the thread already, I’d suggest just buying a patch on Amazon. They’re super affordable.
Learn how to sew on the patch.
If you sew a lot, make sure to check out our new app, Sew Organized, available FREE on the Android Play Store and the Apple App Store.

How to Sew a Paw Patrol Ryder Vest
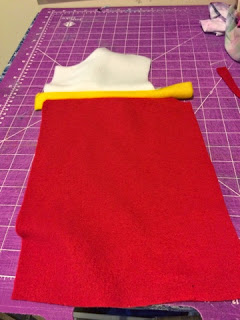
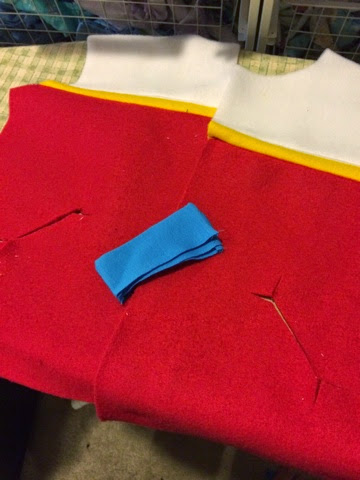
I didn’t really have a good idea how to do this… I imagine it’d be better to sew a big lot of fabric together with the color combo you want, then cut out the whole pattern. But instead I cut the pattern slightly above “the arm hole corner” (lol) and cut the top piece of white, the bottom pieces of red, then I cut a 1.5″ strip of yellow to go between the two. I just cut a long strip of yellow for that and trimmed excess after.
I sewed the yellow strip right sides together with the above and below white/red pieces. Then I top stitched with the coordinating thread. I tried to trim as much extra fabric as possible so it wouldn’t be too bulky.

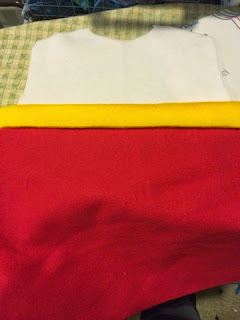

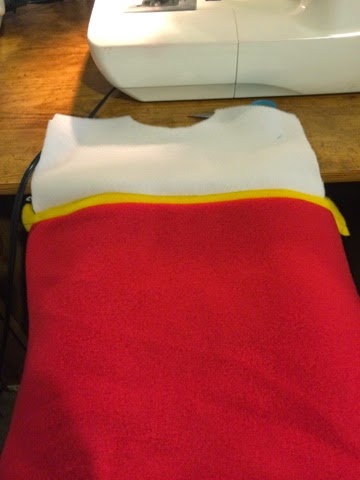
Once I got it all together, I just placed my paper pattern on top and trimmed away the excess yellow fabric.

Repeat for your back and other front piece.

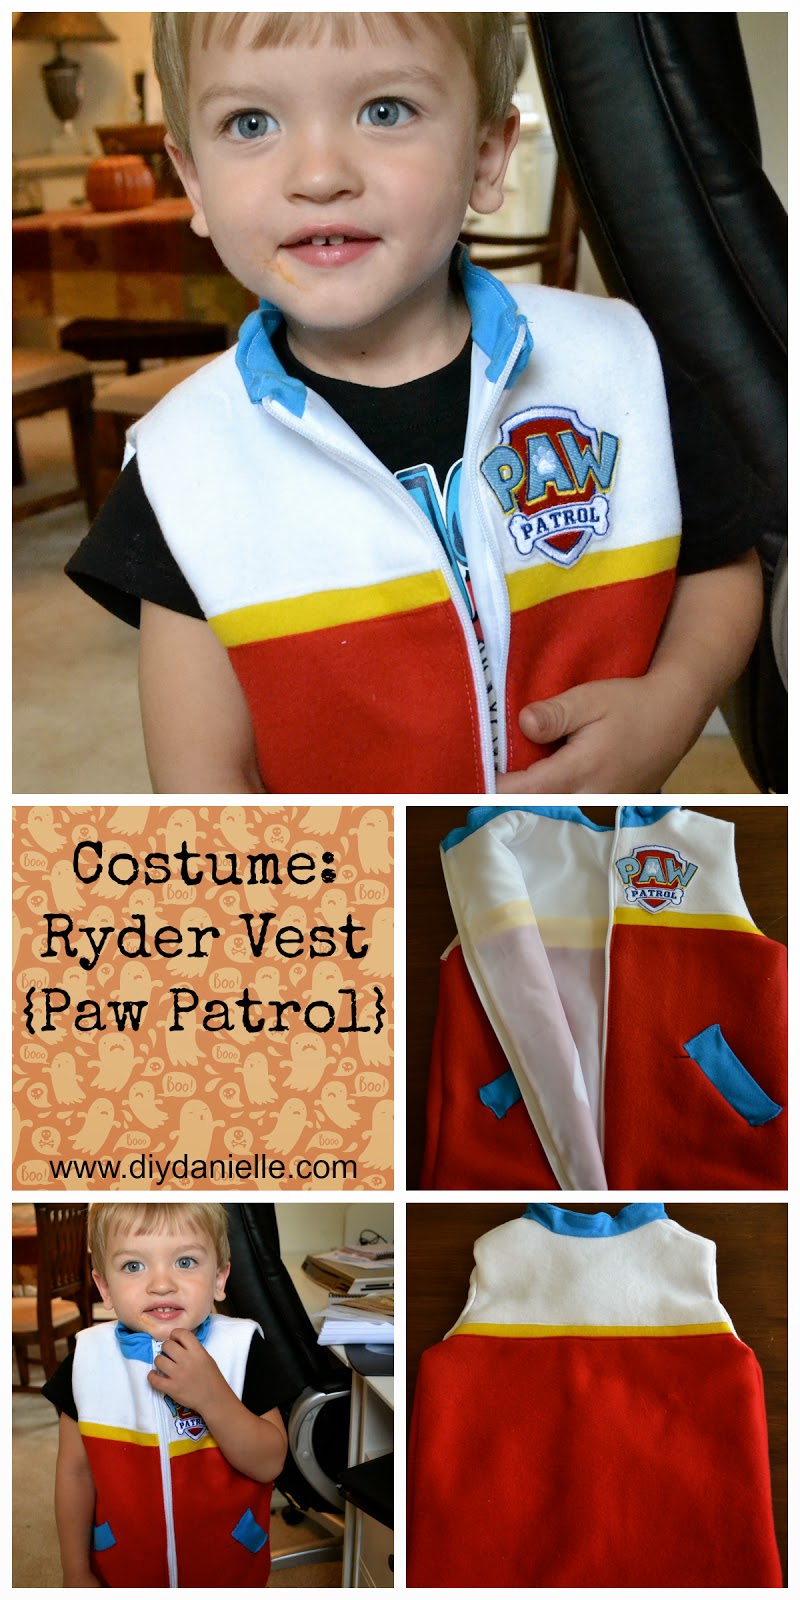
The only other thing that ends up being different is that you want to use a blue collar and pocket edge. I used the white liner for the actual pockets (inside part).

Things to note:
- Don’t cut the holes for the pockets too big. I’ve never done pockets and I think I cut mine too big which led to a couple places where the fabric is cut… I’m going to go hand sew those parts closed with matching thread, but it’s not super noticeable (I don’t think) so at least that’s good.
- I used blue ribbing for the collar. I think I’d use fleece if I were to do it over. I think the stiffness would be better and match the rest of the vest.
- I used a thin inner liner. In retrospect, I think using a cotton or even another layer of fleece would’ve been nice and warmer. We’re in Maryland and I was thinking I didn’t want him to be too hot… but it’s not even half way through October and I’m cold so maybe the double layer of fleece would’ve been a good call. The liner I used frayed a lot too which drove me nuts.
- I didn’t line the arms or the bottom of the vest with blue which if you look in pictures is how Ryder’s vest is. I was going to, but I liked it as is once I finished it as is… and I didn’t want to spend the time or energy required to fix it.
- You need very very little yellow fabric. I used yellow, red, and white fleece fabric. I didn’t need a ton of any of it really.
- The one thing that’s making me twitch a bit is that the yellow stripe doesn’t line up correctly with the two front sides. I didn’t notice until it was all done, but I’m sure this is avoidable if you pay attention to that during sewing.
Anyhow I finished it and I ran upstairs, excited to put it on my son and he says “No, I wear this” and points to his shirt. He would not put this on. Sweet. A few hours later my husband managed to bribe him somehow to put it on so we got a couple quick photos, but then he immediately took it off. Hopefully by Halloween he’ll be more enthusiastic. Now I just need to make the dog a really obnoxious outfit so he can be Zuma.

How to Make a Paw Patrol Ryder Costume
Make an adorable Paw Patrol Ryder costume that is also sensory friendly for children.
Materials
- Yellow fleece
- White fleece
- Red fleece
- Blue ribbing
- White lining fabric
- Paw Patrol Patch
- Vest Pattern
Tools
- Sewing Machine
Instructions
- Cut the pattern above the arm hole with the top piece in white fabric and the bottom pieces in red fabric.
- You will also need a 1.5″ strip of yellow to go between the two.
- Sew the yellow strip right sides together between the white and red pieces.
- Top stitch with the coordinating thread.
- Trim any extra fabric.
- Place your paper pattern on top and trim away any excess yellow fabric.
- Repeat for your back and second front piece.
- Use your white liner for the inside of the pockets.
Recommended Products
As an Amazon Associate and member of other affiliate programs, I earn from qualifying purchases.
-
 Paw Patrol Embroidered Iron On/Sew On Patch
 -
 Polyester China Silk Lining Fabric 60" Wide Habutai by The Yard (White, 1 Yard)
 -
 Red Anti Pill Solid Fleece Fabric, 60" Inches Wide - Sold By The Yard
 -
 Newcastle Fabrics Polar Fleece Solid White Fabric By The Yard
 -
 Yellow Anti Pill Solid Fleece Fabric, 60” Inches Wide – Sold By The Yard
Note: This costume is not for sale at this time. If you’re interested in buying a premade Ryder vest, there are several Etsy shops that sell them. Buy A Handmade RYDER VEST
Other Paw Patrol Tutorials
Make sure to check out these other Paw Patrol tutorials on my blog: Dog Costume: Zuma / Paw Patrol Birthday / Paw Patrol DIY Painting / Paw Patrol Bookshelf
Want something else to make with that vest pattern? Make a Nerf gun vest!
Here’s a video of a one layer version with sleeves!
Love it? Pin it!
Google Web Story: DIY Ryder Vest for Halloween
If you are willing to make another one, I would be willing to pay for one for my grandson. Let me know, Thanks Angie…
Thanks for the offer, but at this time I'm not making stuff to sell. 🙂 I hope to someday, but not quite confident enough yet!
Hi I was just wondering what type of sewing machine did you use to embroider the patch? The vest looks awesome – great job and thank you so much for sharing.
I have a Brother PE770 Embroidery machine that I used for the patch. If you don't have an embroidery machine, I'm guessing you could probably hit up someone to do it for you. 🙂 I couldn't find a patch on Amazon (I LOVE iron on patches because they're less time consuming than embroidering).
Your vest looks incredible so I was wondering if you still had it, would you be willing to sell it?
Would you be willing to sell this particular vest if you still have it?
I will definitely buy this from you if you are willing to sell it! My son wears a 5T and wants to be Ryder! With baby #2 on the way, I can't even think of sewing!
I am also most willing to buy this from you if you are willing to sell it or make another few 🙂
This turned out so adorable! I am going to attempt to make one for my 3 year old son (we also live in MD!) Question… did you use fleece or felt? You stated fleece, but when I nspect the pictures, it sure looks more like felt. I am aiming to make this soon, so please let me know! Thanks!
It's fleece 🙂 Much easier to make with fleece due to the stretchiness of it, although I imagine you could try felt.
can I ask what size the patch was stitched at?
I'm not really sure. It was in a 4×4 hoop I think.
your son is 3 but you made the 5T size — i'm wondering if you think that the vest runs on the small side — hate to make it for my grandson and find out it's too small!
thanks!
My son is big for his age (something like 95% for height) so he was probably in 4T at the time. I went a size up because I wanted it to last longer. 🙂 I recommend doing one size up just because these are awesome and he'll be able to wear it longer, but that's just me.
Your vest came out great and it's obvious your son is very excited to wear it. Is he going to be Ryder for Halloween? Thanks for sharing on #WonderfulWednesday bloghop.
My son would go nuts for this! great idea to do something more comfortable 🙂
Thanks! 🙂 Yeah it worked out really well!
Thank you so much for this post! I am a novice sewer at best but found this easy to accomplish. The only thing I found difficult was sewing the zipper into the collar. My son loves it and cannot wait for Halloween!
I'm so glad to hear it worked out well for you! 🙂 Have a great Halloween!
Do you have the template that you ‘tweaked’ ? I’m hoping to make a vest for my sons birthday party! Thanks!
Just the pattern that I used (it should be linked in the supplies).